Publicity is gearing up for Woodworking FAQ: The Workshop Companion. This week:
Wednesday, April 25th, 7:00 p.m. — Spike launches his book at the Stillwater Public Library, 224 3rd St. North. Directions at Directions to Stillwater Public Library
Thursday, April 26; all day — Radio tour.
* 6:18 a.m. CST: WELW, Cleveland
* 7:40 a.m. CST: WOCM-FM: Baltimore
* 12:25 p.m. CST: KAHI-AM, Sacramento
* 1:30 p.m. CST: WGIV-FM. Charlotte, NC
Saturday, May 19th — presentations (morning and afternoon) at Rockler Woodworking, Minnetonka store. Directions to Minnetonka Rockler store
Sunday, April 22, 2012
Monday, April 16, 2012
WORKSHOP OVERHAUL
Sometimes I take before & after photos of a project—and
wish I hadn’t. That’s because the “after” doesn’t look much better than the
“before.” But I rue not having
taken a before picture of my basement before converting it into a workshop. If
you remember what the basement of the creepy guy in “Silence of the Lambs”
looked like, you’ll have a pretty good visual image of the “before” picture.
The after looks much better.
The
whole project—like most—started innocently. One wall of the basement of our 160
year old house was a mish mash of crumbling brick, cinder block patches and
concrete chunks. I furred out the
wall and installed 1x6 tongue and groove pine paneling to clean up the look.
That involved removing an old set of shelves and clearing out a pile of stuff
that had sat there since we moved in 10 years ago. The completed wall looked so
good that it made the adjacent wall look shabby, so I installed tongue and
groove on that wall. And around the room I went until all the walls were
covered.
The
floor, which was a quilt work of patches and holes, had to be leveled with
floor leveling compound. And of course that had to be covered with tile. And so
on and so on
At
one point it became clear that the rickety old workbench the previous owner had
installed had to go. The doors were falling off their ancient hinges and the
deep drawers were inefficient. Which brings me to the point of this Blog: The
workbench top. “Work top” is probably a better term than workbench top, since
this is the area I use for assembling and gluing up, not planing and hammering.
The
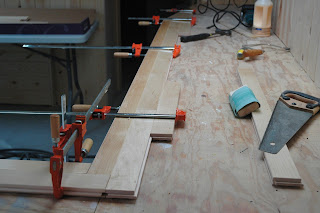
work top area was big and awkwardly shaped, so I did what all good woodworkers
do: Improvised. I bought a couple of boxes of discontinued maple flooring and
started splicing and herringboning the pieces together. These next photos show
how it went together.
And
of course, I needed a place for my miter saw, so I created this little curved
nook to accommodate it. The curve looks cool and prevents me from wanging my hip bones on the sharp corners.
So far, so good. The prefinished top is easy to keep clean
and the maple provides a solid working surface—though it doesn’t take a hit as well as other maples. Pretty soon the workshop will stop being
the project and start being the place where
projects get done.
Tuesday, April 10, 2012
Wooden Bikes & Golden Moments
In my day I've interviewed incredibly talented woodworkers, ridden amazing bikes and met wildly imaginative inventors—but I've never seen all three of these come together in such a neat package as last June in Tanzania.
While troubleshooting the water system in Mwatasi—a village in the highlands region of the country—we encountered these five young gentlemen with their latest creation: A wooden three wheel bike. It may not look like much but look closer. For here you will discover resourcefulness, cooperation, imagination, an understanding of physics and geometry and an overwhelming sense of pride.
As woodworkers we can bemoan not having the space or finances for the latest high tech tool. As bikers we can complain about the potholes and narrow roads we need to navigate. As parents we may even gripe about the lack of educational opportunities for our kids. Whenever I start whining, I look at this photo and recalibrate my brain.
Wooden bikes are more popular around the world than you might think. Below is a photo of bikes ridden in the Banaue region of the Phillipines (note the rear braking system!)
To see other ingenious bikes, visit cool wood bikes
Woodworking FAQ by Spike Carlsen now available. For more information visit
Friday, April 6, 2012
My next project—One big yoke
I’m working on book #4, The Backyard Homestead Guide to
Building Projects which will be released by Storey
Publishing during the summer of 2013.
The
book pretty much contains what the title says—80 building projects for those
seeking a more self-sufficient lifestyle, whether they live downtown, in the
suburbs or in rural areas. (For information on other books in the Backyard
Homestead series and other titles, visit www.storey.com.)
Part
of the challenge in designing projects is to create ones that are useful,
buildable and haven’t been beaten half to death by other books and magazines.
Some projects are straight off the drawing board, some are variations of main
stream projects and some rely on inspiration from the past—like the project I
worked on yesterday: The Bucket Yoke.
Since
5-gallon buckets are used for hauling everything from water to maple syrup to
chicken feed to tools, my editor and I thought a bucket yoke would fit the “useful,
buildable, not beaten half to death” criteria. So off to the drawing board and
down to the shop I went.
The first step was getting a sense of what would be
ergonomically comfortable—for that I drew inspiration from some antique yokes
made for hauling maple syrup sap (photo #1 below)
and the portage yoke from my wood
canoe (bottom yoke in the photo #2)
Photo #2
The next step was to try some variations. The top yoke in
photo #2 put the weight too far forward. Some others I tried weren’t beefy
enough to carry a 40 lb. load on each end. Eventually I came up with the yoke
in the middle of photo 2. I wound up rounding the edges with a router to make
it more comfortable and adding 3 notches to each end to hold the buckets in
place.
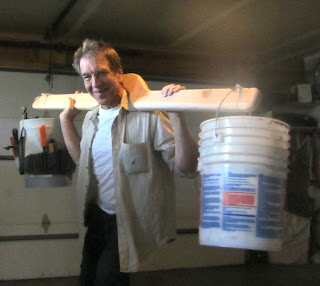
Photo #3 is where the project now stands. The yoke can
easily haul 100 lbs., it can be built with only a jigsaw (you don’t need the router if you feel like spending an hour sanding
the edges by hand) and it’s somewhat unique—the trifecta we were looking for.
If you have ideas for a “backyard homestead building
project” feel free to leave a post or drop me an email at carlsen@usinternet.com.
Subscribe to:
Comments (Atom)
+WW+FAQ+front+cover+jpeg.jpg)


+WW+FAQ+front+cover+jpeg.jpg)


